 Board Photo
Modem Security Enforcer
Model MSE-1
Instruction Manual
Table of Contents
                                                                 Page
1. Introduction and User Operation  . . . . . . . . . . . . . . .  3
     1.1 Use How to This Manual . . . . . . . . . . . . . . . . .  3
     1.2 Applications . . . . . . . . . . . . . . . . . . . . . .  3
     1.3 Definitions  . . . . . . . . . . . . . . . . . . . . . .  4
     1.4 The Modem Security Enforcer Solution . . . . . . . . . .  5
     1.5 Multiple Lines . . . . . . . . . . . . . . . . . . . . .  7
     1.6 Modem Variability  . . . . . . . . . . . . . . . . . . .  7

2. Getting Started  . . . . . . . . . . . . . . . . . . . . . . .  8
     2.1 Hookup . . . . . . . . . . . . . . . . . . . . . . . . .  8
     2.2 Accessing the MSE-1  . . . . . . . . . . . . . . . . . .  8
     2.3 Changing Passwords . . . . . . . . . . . . . . . . . . .  9
     2.4 System Administrator Access  . . . . . . . . . . . . . .  9
     2.5 Creating and Canceling Accounts  . . . . . . . . . . . . 10
     2.6 Front Panel Indicators . . . . . . . . . . . . . . . . . 11
     2.7 Front Panel Control  . . . . . . . . . . . . . . . . . . 12
     2.8 Callback Mode  . . . . . . . . . . . . . . . . . . . . . 13
     2.9 Ongoing Usage  . . . . . . . . . . . . . . . . . . . . . 13

3. Customization  . . . . . . . . . . . . . . . . . . . . . . . . 14
     3.1 Parameter Menu Operation . . . . . . . . . . . . . . . . 14
     3.2 Timing and Related Parameters  . . . . . . . . . . . . . 14
     3.3 Message Parameters . . . . . . . . . . . . . . . . . . . 16
     3.4 Other Parameters . . . . . . . . . . . . . . . . . . . . 20
     3.5 User Account Database  . . . . . . . . . . . . . . . . . 22

4. Hardware . . . . . . . . . . . . . . . . . . . . . . . . . . . 25
     4.1 Jumper Options . . . . . . . . . . . . . . . . . . . . . 25
     4.2 Hardware Menu Access . . . . . . . . . . . . . . . . . . 26
     4.3 Block Diagram  . . . . . . . . . . . . . . . . . . . . . 26
     Figure 4-1: Jumper Locations . . . . . . . . . . . . . . . . 27
     Board Photo
     Figure 4-2: Block Diagram  . . . . . . . . . . . . . . . . . 28

5. The Multiple Configuration . . . . . . . . . . . . . . . . . . 29
     5.1 Pushbutton Operation . . . . . . . . . . . . . . . . . . 29
     5.2 Unit ID  . . . . . . . . . . . . . . . . . . . . . . . . 29
     5.3 Automatic Updates  . . . . . . . . . . . . . . . . . . . 29
     5.4 Copying  . . . . . . . . . . . . . . . . . . . . . . . . 29
     5.5 Connection of Individual MSE-1's . . . . . . . . . . . . 30
     5.6 Card Removal/Insertion . . . . . . . . . . . . . . . . . 30
     5.7 Multiple Cages . . . . . . . . . . . . . . . . . . . . . 30

6. DTE Access . . . . . . . . . . . . . . . . . . . . . . . . . . 31

7. Formal Operational Description . . . . . . . . . . . . . . . . 32
     7.1 Idle State . . . . . . . . . . . . . . . . . . . . . . . 32
     7.2 Access State . . . . . . . . . . . . . . . . . . . . . . 32
     7.3 Active State . . . . . . . . . . . . . . . . . . . . . . 34
     7.4 Program State  . . . . . . . . . . . . . . . . . . . . . 34

8. In Case of Difficulty  . . . . . . . . . . . . . . . . . . . . 35
     8.1 Hardware Problems  . . . . . . . . . . . . . . . . . . . 35
     8.2 Command Problems . . . . . . . . . . . . . . . . . . . . 35
     8.3 Test Arrangements  . . . . . . . . . . . . . . . . . . . 35
     Figure 8-1: Monitor Cable Connection . . . . . . . . . . . . 36

Appendix A. Hexadecimal Bit Map . . . . . . . . . . . . . . . . . 37

Appendix B. Hexadecimal/ASCII Table . . . . . . . . . . . . . . . 38

Appendix C. Parameter Summary . . . . . . . . . . . . . . . . . . 39

Appendix D. Parameter Factory Settings  . . . . . . . . . . . . . 40

Warranty and Limitation of Liability  . . . . . . . . . . . . . . 41
1. Introduction and User Operation

     This chapter provides an overview of the environments where the
Modem Security Enforcer is utilized. Requirements, definitions,
security solutions, multiple line configurations, and modem
considerations are discussed.

1.1 How to Use This Manual

     Chapters 1 and 2 are sufficient in many instances to cover the
material required to install and operate the MSE-1. Should it be
necessary to alter the factory default parameters and jumpers,
chapters 3 and 4 will also be required. If difficulties arise in
using the unit, consult chapter 8. In order to achieve maximum
performance relative to specific needs, it is recommended that the
rest of this manual be examined.

1.2 Applications

     Many types of computer and communications systems are monitored
and maintained through the use of standard ASCII terminals, either
video display or printing terminals. In a large number of situations,
it is desirable to access the system when off-site with remote
terminals. Examples of such systems are: Private Branch Exchange
(PBX) telephone switches, from which data is polled and extracted on
a routine basis, and new stored program control information
periodically loaded by a manufacturer or central organization;
Station Message Detail Recording (SMDR) units, either attached to a
maintenance port on a PBX, or separately attached to telephone lines
of a PBX or key telephone system, which collect and store information
regarding the telephone traffic observed, and dump this data to a
remote billing or network reporting system; in-house corporate
computing centers, which provide external access for the use of
employees, permitting work at home or on the road; and general
purpose computing centers, whose business it is to provide data
processing services to outside users.

     Remote access can be achieved through the installation of
dedicated communications lines between the point of control at the
remote location and the site of the equipment to be served. The
solution of dedicated communications facilities is useful when a
single control access point is desired; however, such communications
facilities can be relatively expensive. In order to reduce these
costs, or to provide a flexible system with variable and multiple
control points, the public switched telephone network is used. This
has the advantage of permitting anyone with suitable terminal and
communications equipment to dial into the system via the telephone
network and attain control of that system, virtually anywhere in the
world. This is mandatory for the case of computing centers which
solicit use by outsiders who change on a continual basis. In
addition, the high cost of dedicated communications lines is
eliminated.

     A significant disadvantage of using the public switched
telephone network for system access, however, is that the system is
open to potential access from parties for which entrance is not
intended. This major problem is increasing in severity with the
proliferation of personal computers, which are easily programmed to
attempt "breaking" into computing and communications systems. For the
cases of PBX monitoring, SMDR units, and similar non-computing
environments, in many instances there is no, or limited, built-in
security provided in that equipment to prevent access. This can have
the effect of unauthorized collection of sensitive data, accidental
modification of control parameters, or intentional changes to an
existing database. Even if the system is not successfully entered,
the caller can tie up the telephone line for extended periods of time
(attempting to guess control words) and prevent authorized access
into the system.

     Computing centers often have some limited form of access
security; this can also suffer from the problem of tying up telephone
lines from authorized users during access attempts by unauthorized
individuals. These security measures are integral parts of extremely
complex operating systems resident in the computer itself. It is
generally well known in the software field that the more complicated
a system is, the more likely it is that some combination of events
can be used to gain unintended access. It is difficult to know if
"back doors" have been implemented in system software, permitting
undesired access by system programmers. Indeed, there can be no
absolute assurance that software packages written by outside vendors
do not contain such "hooks". Sophisticated system software products
can be so complicated that it is impossible or extremely difficult to
analyze to determine if system security has been compromised. Former
employees who at one time had clearance may know of non-obvious
schemes to enter a computing system, even after removal of the
"normal" way access is attained.

     The end result is that although public switched access is highly
desirable for authorized access into many systems, doing so opens a
Pandora's box which can lead to unauthorized access with dire
consequences. The data security problem may be due to the lack of
sufficient security measures on the controlled equipment, or the lack
of assurance that alternate access methods do not exist on complex
computer systems. The vengeance of a disgruntled former employee
intimately familiar with the internal workings of a data processing
facility, who knows how to wreak maximum damage, can prove highly
destructive.

1.3 Definitions

     Devices which transmit and receive digital data, and are at the
end of a communications channel, are referred to as Data Terminal
Equipment (DTE). Video display and printing terminals, SMDR units,
and computers are examples of DTE.

     A Modem is a device which interfaces digital data with
conventional voice telephone lines. Digital information to be
transmitted to a remote location is converted into a form suitable
for transmission, and sent over the line. Information received from a
similar unit at the far end is converted into digital form compatible
with data terminal equipment. Modems are referred to as Data
Communications Equipment (DCE).

     RS-232 is a standard serial interface which is used to connect
DTE and DCE together. Pinout definitions are such that pairs of
equipment designated as DTE and DCE mate, and can directly be
connected together. DTE designated equipment cannot be directly
connected to other DTE designated equipment, or DCE designated
equipment directly connected to other DCE designated equipment. The
most common form of connector is the DB-25 socket or plug. Whether a
device is wired as DTE or DCE cannot reliably be determined from the
type of DB-25 connecter (male or female), and may require Gender
Changers to permit connection.

     A Null Modem is a connector which converts a DTE device into the
pinout of a DCE device, or a DCE device into the pinout of a DTE
device. A null modem is used to make DTE-DTE or DCE-DCE connections.

     Baud Rate is the number of bits per second transmitted or
received over a serial (RS-232) line. In order to properly
communicate, two devices must use the same speed.

1.4 The Modem Security Enforcer Solution

     The MSE-1 is designed to eliminate the data security problem
encountered in using the public switched telephone network for access
into a modem. It breaks the connection between the RS-232 ports of
the DCE (modem) and the DTE, and is placed between the two units. In
order to gain access from the telephone network, access must first be
secured into the MSE-1 prior to a through connection being
established between the modem and the protected equipment.

     When the modem receives a telephone call, it notifies the MSE-1,
which then sets up an interactive conversation with the potential
system user. A variety of security measures are available, selection
of which is dependent upon the particular needs of the system. If
access is granted, the user is notified, and transparently connected
to the DTE. If access is denied, a through connection is not
established, and the system is locked out from further access
attempts for a predetermined time period.

     The MSE-1 solves the security problem for PBX's and like
equipment by putting into place a protection arrangement superior to
that provided by the DTE directly. It solves the security problem for
sophisticated computing centers by placing a separate physical device
ahead of the computer, providing a clear line of demarcation between
outside access and the computer itself. Any internal knowledge of the
computer is of no use in gaining computer access, since no connection
is made between the modem and the computer until the MSE-1 has
validated that the accessor is authorized. The MSE-1 cannot be
programmed without being on site (unless it is desired to override
this safety factor), so even if a potential abuser knows about the
MSE-1, that information cannot be used to modify the MSE-1 in order
to achieve access.

     Authorized users are issued an Account, which consists of the
following: a Login Name; a Password; a Callback Number; a cumulative
count of successful accesses; and a count of unsuccessful access
attempts since the last successful access. A global record is kept of
all successful accesses and unsuccessful access attempts which led to
a Lockout. These can be read by the System Administrator.

     When the maximum security provisions are in place, the access
procedure consists of the following steps:

1. The user calls the access telephone number, either manually or
through an autodial provision of his modem (user modem). This step is
identical to whatever is done without the Modem Security Enforcer.

2. The system modem answers the call, and alerts the MSE-1. The user
modem acknowledges the connection.

3. If the system modem does not indicate High Speed, and the Autobaud
option of the MSE-1 has been selected, the user enters <Return>.
Otherwise, this step is omitted.

4. The MSE-1 issues an identification request to the user. This
message is programmable by the System Administrator.

5. The user enters his Login Name.

6. The MSE-1 asks for the user's Password. This message is
programmable by the System Administrator.

7. The user enters his Password.

8. The MSE-1 informs the user that he will be called back. This
message is programmable by the System Administrator.

9. The MSE-1 directs the system modem to hang up the call.

10. The user either manually hangs up his modem, or the user modem
detects loss of carrier, automatically hangs up the line, and
notifies the user.

11. The MSE-1 retrieves the user's Callback Telephone Number, and
commands the system modem to dial it.

12. Either the user modem automatically answers the callback, or the
user manually commands his modem to answer the call.

13. The system modem notifies the MSE-1 that the call has been
answered by the user modem.

14. The MSE-1 asks for the user's Password. This message is
programmable by the System Administrator.

15. The user enters his Password.

16. The MSE-1 sends a connection message to the user. This message is
programmable by the System Administrator. Typically, it will state
the cumulative number of accesses and the number of unsuccessful
access attempts since the last successful access.

17. The MSE-1 establishes a communications path between the system
modem and the DTE.

18. The user conducts an interactive session with the protected
equipment.

19. The user hangs up and the system modem notifies the MSE-1.

20. The MSE-1 sends a logoff message to the DTE. This message is
programmable by the System Administrator.

21. The MSE-1 and the system modem are ready to receive another call.

     If the Access Time, specified by the System Administrator,
elapses from the time the system modem answers the initial call, and
final acceptance and through connection to the DTE is established,
the access procedure aborts. The MSE-1 commands the system modem to
hang up the call.

     If the number of incorrect Login Name or Password entries
reaches the Error Maximum, specified by the System Administrator, the
MSE-1 goes into a Lockout State. The MSE-1 is frozen for Lockout Time
minutes, specified by the System Administrator. During this time, the
Idle lamp on the front of the MSE-1 flashes. Depression of the
Pushbutton will prematurely exit this state. At the conclusion of the
Lockout Time, the modem is commanded to hang up the call, and the
MSE-1 and the system modem are ready for another call.

     After successful access, and during interactive activity between
the user and the protected equipment, if the Maximum Time is reached,
specified by the System Administrator, or there is a period of time
where no characters are sent in either direction which is equal to
the No Activity Time, specified by the System Administrator, the
MSE-1 sends the Logout Message to the DTE, and commands the system
modem to hang up the call.

     Less secure operational Modes can be selected for the MSE-1.
Controlled by the Pushbutton, the requirements to enter the initial
Password, call the user back, and request a Password after the
callback, can be independently removed. The MSE-1 can be taken out of
Protected mode, which allows free access from the system modem to the
DTE.

     If the user wishes to change his Password, he prefixes the Login
Name with a single character, specified by the System Administrator.
All operation is identical up to the point where access is granted
(through step #15). When this occurs, the MSE-1 prompts the user for
the new Password. If <Return> is entered, no change is made.
Otherwise, after an identical repetition, the Password is changed
accordingly. The procedure continues at step #16 (connection message
sent).

     All information stored in the MSE-1 is contained in non-volatile
EEPROM, and is retained after loss of power. The MSE-1 operates at
the following baud rates: 50, 75, 110, 134.5, 150, 200, 300, 600,
1200, 2400, 4800, and 9600. Eight bits, or seven bits plus parity can
be selected. The unit is powered from 117 volts AC.

1.5 Multiple Lines

     In environments such as computer centers, there are many
telephone lines accessed as a group by outside users. For these
situations, the rack mount MSE-1 is used. All individual MSE-1 units,
one per line, intercommunicate. User accesses and failures, user
password changes, and system programming, when performed on any line,
are reflected to all other MSE-1 units in the group. The Mode
selection by the Pushbutton controls all units as well.

1.6 Modem Variability

     The MSE-1 operates by receiving notification from the system
modem, and commanding it. The unit is designed to permit operation
with any modem meeting minimum capabilities. All command sequences
sent to the modem are programmable by the System Administrator, so
commands required for control can be implemented, no matter what the
specific instructions are.

     The system modem must have a Carrier Detect output (pin 8), to
notify the MSE-1 that a call has been received, and that a callback
has resulted in an answer. If this is not available, Data Set Ready
(DSR, pin 6) can be used in some applications, with this line set to
be active after answering.

     The system modem should be capable of being commanded to dial a
telephone number. If this is not available, the MSE-1 can still be
used in the Initial Password without Callback Mode.

     Upon power-up, the MSE-1 sends an initialization command to the
system modem. This is specified by the System Administrator, and can
be used to set defaults in the modem which are not impervious to
power failures.
2. Getting Started

     This chapter describes how to connect the MSE-1 and operate with
the factory defaults. Front panel operation and account setup are
detailed.

2.1 Hookup

     It is assumed that prior to the installation of the MSE-1, the
existing modem and DTE are compatible, connected, and fully
operational together. If this is not so, resolve any problems between
those two units before attempting to connect the MSE-1. The modem
should be placed into auto answer mode, so that dialing the modem
number results in the modem answering the line, and connecting
through to the DTE, thereby establishing communications.

     Plug the power transformer assembly, supplied, into the mating
power connector on the rear of the MSE-1 unit. Plug the transformer
into a standard 117 volt AC outlet. The Idle, Protect, and Init PW
lamps should be on, with no others illuminated. Disconnect the RS-232
cable connecting the modem to the DTE system to be protected. Connect
the DTE system to the DTE connector on the rear of the MSE-1. This is
located above the power connector. Connect the modem to the DCE
connector on the rear of the MSE-1. Be certain that all connectors
are fully seated for positive contact.

     Factory settings assume the following configuration: pin 8 of
the modem provides a Carrier Detect output; communications initiated
from the DTE side are at 1200 baud; the MSE-1 will transmit 7 bits
plus an even parity bit; operation is full duplex; upon reception of
carrier from the modem, a High Speed indication from the modem (pin
12) forces 1200 baud operation; if the High Speed signal is not
active, Autobaud is performed; the DTE generates a DTR signal (pin
20) when communications are to be accepted; the modem accepts DTR
input; and the modem communicates via Hayes compatible commands. Set
switch 1 up for Hayes Smartmodems. If any of these conditions are not
met, consult chapters 3 and 4 to configure the MSE-1 to the specific
requirements.

2.2 Accessing the MSE-1

     Dial into the modem with a standard ASCII terminal. The modem
should answer the line, the MSE-1's Idle lamp extinguish, and the
Access lamp illuminate. If the modem supports the High Speed line,
and the call was made at the High Speed (assumed to be 1200 baud), at
this time the MSE-1 will send the Login Prompt Message:

               MSE-1 Unit #1
               Security ID:

If not, wait several seconds and send a single <Return> (ASCII 13
decimal, 0D hexadecimal). The "<...>" is used here to indicate that a
single character is sent, and is represented by the description
contained within the brackets. The MSE-1 will then send the Login
Prompt Message.

     Respond   to  the  Login  Prompt  Message:  "John Doe<Return>".
Type everything between, but not including, the quotation marks.  Be
certain to include a single space between John and Doe, and no space
either before John or <Return>.  Either upper or lower case may be
used.   The  MSE-1  will  respond  with  the  Password Prompt
Message:

               Security Password:

Respond by typing "JD<Return>". Either upper or lower case may be
used. The MSE-1 will respond with the Active Message:

               John Doe, 1200 Baud
               00 Previous Failed Attempts
               0001 Accesses

If the baud rate is other than 1200, the appropriate speed will be
shown. The number of Previous Failed Attempts and Accesses may be
other than 00 or 0001.

     The Access lamp will extinguish and the Active lamp illuminate.
At this point, communications are established with the DTE; test by
conversing with the protected equipment identically to the manner
used prior to the installation of the MSE-1.

     At the conclusion of the test, hang up; the modem will hang up
the line, the MSE-1 Active lamp extinguish, and the Idle lamp
re-illuminate. The MSE-1 will have sent the Logoff Message to the
DTE:

               <Control C>Logoff<Return>

If this message is not appropriate, consult chapter 3.

     Factory defaults will cause an automatic disconnection if there
are no characters sent between the DCE and DTE for a period of 30
minutes, or if the overall time exceeds 5 hours. A maximum of 2
minutes is permitted while in Access State. See chapter 3 to change
these values.

2.3 Changing Passwords

     Repeat the above procedure, except use "+John Doe<Return>" as
the Login Name. Instead of directly going to the Active State after
supplying the Password, the following message will be displayed:


               Enter New Password:

If <Return> is typed at this time, no change will be made, and the
Active Message will be displayed. Change the Password to another
character sequence, followed by <Return>. The following message will
be displayed:

               Repeat:

Reenter the new Password, followed by <Return>. John Doe's password
is now changed, and the Active Message displayed.

2.4 System Administrator Access

     Repeat the above procedure, using the System Administrator's
Login Name and Password instead of "John Doe" and "JD": "Super" and
"SU". No errors are permitted in the entry of the "Super" Login Name;
if a mistake is made, hang up and start over. In place of the Active
Message, the System Administrator Menu will be displayed:

               0 Exit
               1 Stats
               2 List
               3 Account
               4 Parameters
               5 Copy
               6 Format

               ?

This time, the Access lamp will extinguish, and the Program lamp
illuminate. Type "1". Displayed will be:

               Successes-Lockouts: 0004 0001

followed by the Menu. The numbers may be different than those shown
above. The first number is the cumulative overall number of
successful accesses the MSE-1 has received since manufacture. The
second number is the cumulative number of times a user has
unsuccessfully attempted to access the MSE-1 and made Error Maximum
mistakes (factory default is 7).

2.5 Creating and Canceling Accounts

     In response to the Menu query, type "2". A list of all Accounts
in the MSE-1 will be displayed:

     Super: Tel # = , Accesses = 0003, Failures = 00
     John Doe: Tel # = 5551212, Accesses = 0002, Failures = 00

followed by the Menu. The Accesses and Failures may differ.

     Type "3". The following message will be displayed:

               Account:

Using upper and lower case, enter a Login Name desired for use,
terminated with <Return>. A maximum of 15 characters may be used, and
if this maximum is used, do not type the <Return>. If a different
maximum Login Name length is desired, consult chapter 3. The
following message will be displayed:

               + to Add:

If a mistake is made in typing the new Login Name, type <Return> (or
any character other than "+"). Otherwise, type "+". The following
message will be displayed:

               Enter New Password:

Type in the Password desired; any number of characters may be used,
and any of the 128 ASCII values may be utilized with the exception of
<Return>. Terminate the Password with <Return>. If it is desired to
have no Password for this Account (in which case the user must
respond to the Password Prompt Message with a single <Return> to gain
access), simply type <Return> for the Password. If a Password is
entered, the following message will be displayed:

               Repeat:

Retype the same Password, followed by <Return>. The following message
will be displayed:

               Callback #:

Type in the telephone number to be dialled to reach this particular
user. If less than 10 digits are to be dialled, suffix the telephone
number with "F" until a total of 10 characters have been typed. If no
callback number is to be used for this account, type "FFFFFFFFFF". If
this is done, callbacks will not be made for this account, even if
the MSE-1 is in the Callback Mode. After typing the last digit of the
telephone number field, a current listing of the new account will be
displayed, showing Accesses = 0000 and Failures = 00.

     The Account prompt will be displayed. Type "John Doe<Return>".
The information regarding this account will be shown, followed by the
following message:

               # to Cancel:


Type "#". This cancels the John Doe account. Type <Return> to the
redisplayed Account message, and the Menu will reappear.

     Type "0" to exit Program Mode. The Program lamp will extinguish,
and the Access lamp illuminate. Type <Return> to test the new Login
Name just added (the <Return> will not be necessary if the High Speed
line is active).

     Menu options 4 and 6 are described in chapter 3, and option 5 in
chapter 5. In general, the Account option asks for a Login Name; if
the account entered currently exists, that information will be
displayed, and an option supplied to cancel the account. If a new
Login Name is entered, an option is given to add that account. The
List option shows all current accounts. The display may be paused by
sending a <Break>; the display will continue when the <Break> is
released.

     If it is desired to change the System Administrator's Login Name
from the factory default of "Super", utilize the following procedure.
First cancel "Super". IMMEDIATELY thereafter, add a new account. This
account will become the System Administrator's Login Name. If the
System Administrator's account is canceled and not replaced prior to
hanging up, it will not be possible to access the Menu in the normal
fashion. Should this occur, consult section 4.2. To change the Super
Password, do not follow the above procedure; use the Change Password
procedure previously described.

2.6 Front Panel Indicators

     The front panel of the MSE-1 contains ten indicator lamps, in
three groups. These lamps have the following meanings:

Status Indicators

The Status indicators are green. Only one of the four Status lamps
will be illuminated at any one time.

Idle:
The MSE-1 is currently inactive. It is ready to receive a Carrier
Detect indication from the modem to initiate access. A character from
the DTE will initiate access from that port.

Access:
A potential user is currently attempting to gain access to the
protected equipment, but has not yet succeeded or failed. The user
may be in the process of entering the Login Name or Password, or the
modem may be in the process of calling the user back.

Active:
A user has successfully gained access to the protected equipment, and
is in communication with it. A timeout, loss of carrier from the
modem, or loss of DTR from the DTE will cause exit to the Idle state.

Program:
The System Administrator has accessed the MSE-1. System programming
is now accessible via the Menu. Selection of the Exit option, loss of
carrier from the modem (if accessed from the DCE side), or loss of
DTR (if accessed from the DTE side) will cause exit to either the
Idle or Access states.

Mode Indicators

The Mode indicators are amber. Various combinations of the four Mode
lamps may be selected, depending upon the desired operating Mode.

Protect:
The MSE-1 is currently protecting the DTE from access. If this lamp
is extinguished, upon Carrier Detect from the modem, the MSE-1 will
immediately go into the Active State. This bypasses the MSE-1
security provisions.

Initial Password:
After receiving the Login Name from the user, the user will be
prompted for entry of a Password. If this lamp is extinguished, this
initial password request will be skipped.

Callback:
After receiving the Login Name and initial Password from the user (if
Initial Password selected), the MSE-1 will instruct the modem to call
the user back at the telephone number stored under that account. If
no telephone number is stored for the account, or if this lamp is
extinguished, this step will be skipped.

Callback Password:
After calling the user back, the user will be requested to enter a
Password. If this lamp is extinguished, this step will be skipped.

Lock Indicators

The Lock indicators are red. Any of the four possible combinations of
these two lamps may be selected.

DCE:
The MSE-1 will not accept access via the System Administrator's Login
Name to reach the Program State from the modem. If this lamp is
extinguished, permission is granted for this procedure.

DTE:
The MSE-1 will not accept access via the System Administrator's Login
Name to reach the Program State from the DTE side. If this lamp is
extinguished, permission is granted for this procedure.


2.7 Front Panel Control

     A Pushbutton located on the MSE-1 front panel is used to control
the Mode and Lock indicators. A single depression of the Pushbutton,
if released within 1.5 second, alters the Lock lamps. To obtain the
desired combination of the Lock indicators, depress and release the
Pushbutton until these lamps show the appropriate condition. The
sequence rotates from the top of the following list to the bottom,
and then restarts at the top:

               DCE Lock    DTE Lock
                  Off         Off
                  On          Off
                  Off         On
                  On          On

     To alter the Mode lamps, depress the Pushbutton and hold it
depressed. At 1.5 second intervals, the Mode lamps will change
according to the following sequence:

     Protect  Initial Password  Callback  Callback Password

     Off           Off           Off           Off
     On            Off           Off           Off
     On            On            Off           Off
     On            Off           On            Off
     On            On            On            Off
     On            Off           On            On
     On            On            On            On

When the desired Mode is reached, release the Pushbutton. If desired,
subsequently change the Lock lamps as described above.

2.8 Callback Mode

     After creating an account with a valid telephone number, change
the operating mode so that all four Mode indicator lamps are
illuminated. Call the modem, and use the new Login Name. After
entering the Password, the following message will appear:

          Calling Back. Hang Up . . .

The modem will call the specified telephone number. When carrier is
detected, the Callback Password Prompt Message will appear:

          MSE-1 Unit #1 Returning Your Call.
          Security Password:

Reenter the Password, and the Active Message will be displayed as
before.

2.9 Ongoing Usage

     Select the desired operating Mode. Add all user accounts.
Periodic reading of the Statistics can be done to determine who is
using the system. If Lockouts are higher than expected, List the
accounts, and look for any user with an unusual number of Failures.
Consult with the user to determine if he is familiar with the access
procedure. It could be that some other person is attempting to guess
that particular user's Password. If this is the case, it may be
desirable to change the Login Name of that account.

     For maximum security, leave both Lock lamps illuminated except
when it is desired to enter the Program State. This ensures that the
integrity of the account structure is maintained, even if someone
discovers the System Administrator's Login Name and Password.
3. Customization

     This chapter describes the use of the Parameter and Format
options available through the System Administrator's Menu. These are
used to customize the MSE-1's operation to meet specific
requirements.

3.1 Parameter Menu Operation

     All parameters are assigned specific Locations. The contents of
the parameter Locations can be read and modified through the use of
Menu option 4. Locations consist of two hexadecimal digits. A
hexadecimal digit is one of the following 16 characters: 0; 1; 2; 3;
4; 5; 6; 7; 8; 9; A; B; C; D; E; and F. Either upper or lower case
may be used for the alphabetic characters. There are 256 Locations
where Parameters are stored, denoted as locations 00, 01, 02, ... FE,
FF. The use of each of these Parameters is detailed in subsequent
sections.

     To access the Parameters, log in as the System Administrator.
From the Menu, type "4". The following message will appear:

               Location:

Type "00". The following line will appear:

               00 4D M

The 00 on the left indicates that Location 00 is being examined; 4D
is the hexadecimal contents of Location 00; and M is the ASCII
character represented by the hexadecimal value 4D. Type <Space> to
examine the next Location. The following line will appear:

               01 53 S

This indicates that Location 01 contains hexadecimal value 53, which
is ASCII character S. Continue typing <Space> until Location 06 is
displayed, with contents 55. Type "40". This changes the contents of
Location 06 to 40, and Location 07 is next displayed. Type "-", and
Location 06 will be redisplayed, showing that the contents are now
40. Type "55" to restore the data.

     Type <Return>, and the "Location" message will reappear. Again
type <Return>, and the Menu will be displayed.

     This demonstrates the use of the Parameters Menu option. Upon
selection, the two-character hexadecimal Location of the desired
Parameter is entered. The hexadecimal contents and ASCII value of
that Location are displayed, the latter of which is useful for
certain Parameters. To change the contents, type the replacement
hexadecimal value; to return to the "Location:" message, type
<Return>; to backup to the previous Location, type "-"; and to
advance to the next Location, type <Space> (or any other character).
To exit from the Parameters sub-Menu, type <Return> from the
"Location:" message.

     Care should be taken while in the Parameters option so as not to
inadvertently change Locations where modifications are not intended.

3.2 Timing and Related Parameters

     There are eight Parameters used to set timeout lengths, baud
rates, delays, and failures.

No Activity Time:
Location 1A. This is a value which sets the maximum number of minutes
which is to be permitted with no activity between the DTE and DCE.
Values are decimal from 00 to 99 minutes. A value of 00 deactivates
this Parameter; there will be no forced disconnection due to lack of
communications through the MSE-1.

  Factory setting = 30 minutes.

Maximum Time:
Location 1B. This is a value which sets the maximum number of hours
which is to be permitted for a single access. Values are decimal from
00 to 99 hours. A value of 00 deactivates this Parameter; there will
be no forced disconnection due to a maximum connect time being
exceeded.

     Factory setting = 5 hours.

Access Time:
Location 1E. This is a value which sets the maximum number of minutes
which is to be permitted for a user to remain in the Access State.
This time includes entering the Login Name, Password, dialing the
user back, and reentering the Password (if all such options are
selected according to the Mode). Values are decimal from 00 to 99
minutes. A value of 00 deactivates this Parameter; there will be no
forced disconnection due to exceeding a time value in the Access
State. This Parameter should be kept as small as possible for
security reasons.

  Factory setting = 2 minutes.

Error Maximum:
Location 1C. This is a value which sets the maximum number of errors
which is to be permitted while in the Access State. This count
includes entering the Login Name, Password, and reentering the
Password (if all such options are selected according to the Mode).
Upon reaching this error count, the MSE-1 will enter the Lockout
State. Values are hexadecimal from 00 to FF errors. An entry of 00
sets Error Maximum to 256. This Parameter should be kept as small as
possible for security reasons.

     Factory setting = 7 errors.

Lockout Time:
Location 1D. This is a value which sets the number of minutes which
the MSE-1 will remain in the Lockout State, reached by exceeding the
Error Maximum in the Access State. During this time, communications
and accesses are disabled, and the Idle indicator lamp flashes. When
this time elapses, the unit will return to the Idle State. This time
period may be aborted by depression of the Pushbutton. Values are
decimal from 00 to 99 minutes. A value of 00 deactivates the
Parameter; there will be no exit from the Lockout State other than
through use of the Pushbutton or a power failure.

     Factory setting = 10 minutes.

Carrier Detect Delay:
Location 19. This is a value which sets the number of seconds the
MSE-1 will delay after receiving indication of carrier detection from
the modem. If the modem sends messages upon connection, this delay
value must be set to exceed the time period for all such messages. At
the conclusion of the delay period, the MSE-1 samples the High Speed
output from the modem, and commences looking for a <Return> from the
user, if at low speed and Autobaud is selected. Otherwise, the Login
Prompt Message will be sent at the conclusion of this delay. Values
are hexadecimal, ranging from 00 to FF. A value of 00 delays 256
seconds; other values correspond to the hexadecimal value. This
Parameter should be kept as small as possible.

     Factory setting = 3 seconds.

Default Baud Rate:
Location 17. This is a value which sets the baud rate used for access
via the DTE port. If Autobaud is not selected, and the High Speed
line from the modem is inactive, this baud rate will also be used for
access via the modem. The hexadecimal value shown in the following
table corresponding to the desired baud rate is entered as the
contents of this Location. Changing this Parameter will not change
the current baud rate; it takes effect on the next Access. Care
should be taken to ensure that this Parameter is entered properly;
incorrect values will cause loss of communications.

     Factory setting = 15 (1200 baud).

               Baud Rate  Parameter Value

                 50           4D
                 75           46
                110           3F
                134.5         38
                150           31
                200           2A
                300           23
                600           1C
               1200           15
               2400           0E
               4800           07
               9600           00

High Speed Baud Rate:
Location 18. This is a value which sets the baud rate used for access
via the modem when the High Speed line from the modem is active. The
hexadecimal value shown in the preceding table corresponding to the
desired baud rate is entered as the contents of this Location.
Changing this Parameter will not change the current baud rate; it
takes effect on the next Access. Care should be taken to ensure that
this Parameter is entered properly; incorrect values will cause loss
of communications.

     Factory setting = 15 (1200 baud).


3.3 Message Parameters

     Messages sent from the MSE-1 to the DCE and DTE ports are stored
in ASCII form. The ASCII code assigns hexadecimal values 00 through
7F with 128 printing and nonprinting characters. Any of the 128
possible values may be included in the messages generated by the
MSE-1. Appendix B depicts the printing ASCII values.

     There is no restriction on the length of particular messages,
other than the overall total length of all messages. Messages are
created by intermixing representations for ASCII characters with
special codes. Messages consist of a sequence of hexadecimal values
having meaning according to the following chart:

          Message Codes

     00 - 7F: Send the literal ASCII character
     80:      Pause 256 seconds
     81 - F4: Pause 1 - 116 seconds
     F5:      Send the Unit ID
     F6:      Send the User's Login Name
     F7:      Send the User's Telephone Number
     F8:      Send the User's number of Accesses
     F9:      Send the User's number of Failures
     FA:      Send the current Baud Rate
     FB:      Raise the DCE's DTR lead (modem)
     FC:      Lower the DCE's DTR lead (modem)
     FD:      Raise the DTE's DSR and CD leads
     FE:      Lower the DTE's DSR and CD leads
     FF:      End of message

Characters are transmitted at the current Baud Rate, whether
transmission is to the DCE or the DTE ports. For accesses initiated
on the DCE side, this is determined by the High Speed Baud Rate if
the High Speed signal is active; by the received speed of the initial
<Return> if Autobaud is set and the High Speed signal is inactive;
and otherwise by the Default Baud Rate. Accesses initiated on the DTE
side are always at the Default Baud Rate. All message text must end
with FF. This does not produce any transmitted characters. Special
codes shown do not produce leading or trailing spaces.

     There are 12 messages which are sent by the MSE-1, depending
upon the progression between states. Space is provided to store a
total of 208 characters for all of these messages; this storage area
can be allocated between the various messages as desired for any
particular application. Locations 30 through FF are reserved for
these messages.

     Since it is possible to arrange the text for the messages in
various fashions, the beginning of each message must be identified
for each of the 12 messages. The Locations which contain the starting
Location for each of these messages are shown below. The text
contents are listed as shipped from the factory for each. Characters
shown within quotation marks are ASCII characters, which fall within
the range 00-7F.

Initialization Message:
Location 20. This message is sent to the DCE (modem) upon power-up.
This is used to set modem defaults which cannot be set by default
switches located on the modem and are not stored in nonvolatile
memory within the modem. It is recommended that a pause always be
placed at the start of this message text to ensure that the modem has
completed initialization, and is prepared to receive commands from
the MSE-1.

     Location 20 Factory setting: 30
     Text Factory setting (Locations 30 - 3F):
           "ATE0F1Q1S7=255", <Return>, FF

Login Prompt Message:
Location 21. This message is initiated from the Idle State upon
notification of access. This occurs after a character is received
from the DTE port, to that port, or after recognition of carrier
detection from the modem and the baud rate has been established, to
the DCE port.

     Location 21 Factory setting: 40
     Text Factory setting (Locations 40 - 53):
           <Return>, <LF>, <LF>, F5, <Return>, <LF>,
           "Security ID: ", FF

Password Prompt Message:
Location 22. This message is sent when an Initial Password is to be
received.

     Location 22 Factory setting: 6C
     Text Factory setting (Locations 6C - 81):
           <Return>, <LF>, "Security Password: ", FF

Calling Back Message:
Location 23. This message is sent to the user just prior to hanging
up the line in preparation to calling the user back.

     Location 23 Factory setting: 82
     Text Factory setting (Locations 82 - A2):
           <Return>, <LF>, "Calling Back. Hang Up . . .",
           <Return>, <LF>, <LF>, FF

Active Message:
Location 24. This message is sent to the user after access has been
authorized, just prior to entering the Active State.

     Location 24 Factory setting: A3
     Text Factory setting (Locations A3 - D9):
          <Return>, <LF>, F6, ", ", FA, " Baud", <Return>, <LF>,
          F9, " Previous Failed Attempts", <Return>, <LF>,
          F8, " Accesses", <Return>, <LF>, <LF>, FF

Callback Password Prompt Message:
Location 25. This message is sent to the user after the callback has
been performed, if the Mode requires a callback Password.

     Location 25 Factory setting: 54
     Text Factory setting (Locations 54 - 6B):
          <Return>, <LF>, F5, " Returning Your Call."
Note that this does not include an ending FF, and therefore continues
with the same text as for the Password Prompt Message.

Logoff Message:
Location 26. This message is sent to the DTE port upon disconnection
from the modem, either forced or natural. The DSR and CD leads are
automatically lowered, without specifically including in the message
text. This message can be used to force a system logoff for systems
which do not automatically log the user off with the loss of carrier.

     Location 26 Factory setting: DA
     Text Factory setting (Locations DA - E2):
          <^C>, "Logoff", <Return>, FF

Hang Up Modem Message:
Location 27. This sequence is sent to the DCE port (modem) to force a
hangup.

     Location 27 Factory setting: E3
     Text Factory setting (Locations E3 - E5):
          FC, 85, FF
This lowers the DTR lead to the modem and pauses five seconds to
ensure a disconnection and bypass any responses the modem sends back.

Extension Dialing Message:
Location 28. This message is sent to the modem when it is determined
that a callback is being made to the user, and the user's Telephone
Number is from 1 to 6 digits in length. It is sent after sending the
Calling Back Message and the Hangup Message, and is intended to
instruct the modem to dial the user's Telephone Number.

     Location 28 Factory setting: E6
     Text Factory setting (Locations E6 - ED):
           FB, 82, "ATD", F7, <Return>, FF.

The DTR lead is raised (it was lowered by the Hang Up Modem Message)
prior to issuing the dial command.

Local Dialing Message:
Location 29. This message is sent to the modem when it is determined
that a callback is being made to the user, and the user's Telephone
Number is 7 digits in length. It is sent after sending the Calling
Back Message and the Hangup Message, and is intended to instruct the
modem to dial the user's Telephone Number.

     Location 29 Factory setting: E6

The Factory setting uses the same text as for the Extension Dialing
Message.

Same Area Code Toll Dialing Message:
Location 2A. This message is sent to the modem when it is determined
that a callback is being made to the user, and the user's Telephone
Number is 8 digits in length. It is sent after sending the Calling
Back Message and the Hangup Message, and is intended to instruct the
modem to dial the user's Telephone Number.

     Location 2A Factory setting: E6

The Factory setting uses the same text as the Extension Dialing
Message.

Long Distance Dialing Message:
Location 2B. This message is sent to the modem when it is determined
that a callback is being made to the user, and the user's Telephone
Number is 9 or 10 digits in length. It is sent after sending the
Calling Back Message and the Hangup Message, and is intended to
instruct the modem to dial the user's Telephone Number.

     Location 2B Factory setting: EE
     Text Factory setting (Locations EE - F6):
          FB, 82, "ATD1", F7, <Return>, FF


     The use of the four different Dialing Messages permits a variety
of telephone dialing sequences to automatically be performed. For the
case of an internal PBX system, users who are accessed through the
PBX will have extension numbers stored as their Callback Telephone
Numbers; these are less than 7 digits in length. Outside calls
generally require first dialing "9", and possibly pausing, prior to
dialing an off premise number. These commands must be included within
the other three Dialing Messages, but not in the Extension Dialing
Message. Note that the modem itself must be capable of handling
whatever dialing options are required; the MSE-1 sends the dialing
command to the modem, and the modem then handles the dialing. Pauses
here will usually serve no purpose, since most modems do not begin
seizing the line and dialing until after receipt of the <Return>.
Programmed pauses should be entered as ASCII representations of the
appropriate pause instructions for the particular modem.

     Local telephone numbers are stored as 7 digits in the user's
account. Toll calls which require "1" + the 7-digit telephone number
for dialing should be entered as "1" + the 7-digits in the user's
account. This causes the second Dialing Message to be utilized. In
this way it is possible to use the local Telephone Company for these
calls, yet use a dialup OCC or long distance reseller for other
calls. If it is desired to use a dialup OCC or long distance reseller
for these "1" + 7-digit calls, a separate message text can be created
which includes dialing the OCC's access number, an authorization
code, and the user's number. If the carrier requires the area code
before the 7-digits, the user's telephone number should be stored
including the area code, resulting in the full ten digits, and use of
the Long Distance Dialing Message.

     Telephone numbers out of the local area code are stored with the
area code included in the user's account, using all ten digits. To
use the Telephone Company, or a presubscribed toll carrier for these
calls, all that need be done is to insert a preceding "1" in the Long
Distance Dialing Message, as shown above. If desired, an alternative
carrier can be used by following the appropriate dialing plan for
that carrier in this message text.

     Special provisions, such as international dialing, or sequences
not otherwise provided, can be handled by storing speed number codes
in the user's account instead of the user's actual telephone number.
These speed numbers will be less than 7 digits in length, and will
therefore invoke the Extension Dialing Message. This message text
should instruct the modem to dial using its internally stored speed
numbers. The special dialing provisions can be incorporated as the
speed number in the modem.

     If the modem cannot wait for carrier longer than the Access
Time, include an auto answer off command in the Dialing Messages, and
an auto answer on command in the Hang Up Modem message. It has been
assumed that users own modems capable of both originate and answer
operations. If users have originate only modems, as is sometimes the
case for acoustical couplers, the system modem must be instructed to
call the user back using reverse tones. For Hayes compatible dialing
commands, suffix an "R" to each Dialing Message. For such situations,
users with originate and answer modems cannot place their modems into
the auto answer mode. The callback should be answered with a "D"
command for Hayes compatible user modems (as opposed to an "A"
command).

     For most modems, the only changes that might require
modification from the factory settings are the Initialization
Message, and the Dialing Messages. The dialing commands are commonly
single characters, such as "D" (for "dial"), or "K" (for "keyboard
dial"), if other than the "ATD" required for Hayes compatible modems.
This can simply and quickly be modified from the factory settings by
changing the "A" and "T" to characters which are transparent to the
modem, such as <Space>. By doing so, it is not necessary to change
the starting locations.


Unit ID:
Locations 00 - 0D. This text is sent when the Unit ID code, F5, is
encountered in any of the preceding message texts. This permits
differentiation between multiple lines while retaining identical
Parameter programming for all MSE-1's. Changes can be made from the
factory setting by modifying the 14 Locations to any sequence of
ASCII characters desired. The last character must have the highest
bit set (80 hexadecimal added to the last character's ASCII value).

     Factory setting (Locations 00 - 0C):  "MSE-1 Unit #", B1

3.4 Other Parameters

Change Password Character:
Location 1F. This is the ASCII value of the character which is to be
used to permit users to change their Passwords, by preceding the
Login Name with this character. No account Login Names can begin with
the selected character. If users are not to be permitted to change
Passwords, set this Location to FF.

     Factory setting: 2B ("+").

Successes:
Locations 2C and 2D. These are the Locations where the overall number
of successful accesses is stored. This count is read by the
Statistics Menu option. This value can manually be changed, if
desired. The upper two decimal digits are stored in Location 2C, and
the lower two decimal digits are stored in Location 2D.

Lockouts:
Locations 2E and 2F. These are the Locations where the overall number
of Lockouts accumulated is stored. This count is read by the
Statistics Menu option. This value can manually be changed, if
desired. The upper two decimal digits are stored in Location 2E, and
the lower two decimal digits are stored in Location 2F.

Location 0E:
This Location is bit mapped -- the individual bits 0 through 7 have
specific meaning. They are:

              Bit                 Factory Setting

     bit 0: Initial Password             1
     bit 1: Callback                     0
     bit 2: Callback Password            0
     bit 3: Protect                      1
     bit 4: Computer Pass Through        0
     bit 5: Answerback Only              0
     bit 6: Lock DCE                     0
     bit 7: Lock DTE                     0

     Bits 0-3, 6, and 7 have identical meaning to those described in
section 2.6 regarding the front panel indicator lamps. These are
automatically modified through use of the Pushbutton. If it is
desired to change the Mode of operation via the System
Administrator's Menu, these bits can directly be written under the
Parameters option. If these bits are changed, they will take effect
for the next access.

     If the Computer Pass Through bit is set high, then the MSE-1
will not accept System Administrator access from the DTE port.
Instead, upon receipt of any character from the DTE port while the
DTR lead is high, the MSE-1 will delay one second, and go into the
Active State. It will remain in the Active State until the DTR lead
goes low. While in this state, the DSR or CD lead (depending upon
jumper selection) state is reflected to the DSR and CD leads on the
DTE port. This effectively makes the MSE-1 transparent for the
purpose of permitting a computer connected to the DTE port to
directly control the modem. To activate, the computer must send a
character, pause more than one second, and from that point forward
treat the modem as if the MSE-1 were not in the line. The computer
must lower (and raise) the DTR lead to restore normal operation.

     The Answerback Only bit is set high when the MSE-1 is to perform
line identification only. In this case, upon access from the modem,
the Login Prompt Message will be sent, and the unit will then
immediately enter the Active State. The Login Prompt Message should
be set to identify the particular modem. If the Answerback Only bit
is set, it is not possible to reach the System Administrator's Menu
from the modem port; and if the Computer Pass Through bit is set in
addition, it is not possible to reach the Menu from the DTE port
either. Should this situation arise, consult section 4.2 to reach the
Menu.

Location 0F:
This Location is bit mapped -- the individual bits have specific
meaning. They are:

                 Bit                    Factory Setting

     bit 0: Transmit Odd Parity or Mark        0
     bit 1: Single Unit Pushbutton             1
     bit 2: No Parity                          0
     bit 3: No Autobaud                        0
     bit 6: DCE Echo                           1
     bit 7: DTE Echo                           1

     Transmitted characters consist of data bits 0-6, plus bit 7.
Determination of bit 7 is made by the combination of Transmit Odd
Parity or Mark, and No Parity. If No Parity is set high, then the
meaning of Location 0F, bit 0 is Transmit Mark; if this is set high,
then all transmitted characters will have bit 7 set high (mark); if
Transmit Mark is low, then all transmitted characters will have bit 7
set low (space). If No Parity is low, then instead of jamming bit 7
to a high or a low level, parity is calculated. In this case, the
meaning of Location 0F, bit 0 is Transmit Odd Parity; if this is set
high, then all transmitted characters will have bit 7 set such that
the overall parity of bits 0-7 is odd (an odd number of 1's); if
Transmit Odd Parity is low, then bit 7 will be set to generate even
parity (an even number of 1's).

     If No Autobaud is set high, then the MSE-1 will not expect an
initial <Return> upon access from the modem, and will use either the
Default Baud Rate, or the High Speed Baud Rate. If No Autobaud is set
low, then the MSE-1 will expect an initial <Return> upon access from
the modem without High Speed indication. The MSE-1 will determine the
received baud rate from the <Return>, and proceed with the Login
Prompt Message. The baud rate must be one of the following: 50, 75,
110, 134.5, 150, 200, 300, 600, 1200, 2400, 4800, or 9600.

     If the DCE Echo bit is set high, then any characters received by
the MSE-1 from the modem (the DCE port) in the Access and Program
States will be echoed back to the modem. If the DTE Echo bit is set
high, then any characters received by the MSE-1 from the computer
(the DTE port) in the Access and Program States will be echoed back
to the computer. These controls have no effect in the Active State.

     The MSE-1 always transmits one start bit, and two stop bits. The
value of bit 7 for characters received by the unit is ignored.
Selection of a jam bit or parity bit is required only to match user
terminal characteristics for access. During the Active State, data
bytes transmitted in either direction through the MSE-1 are directly
transferred, without buffering in time; in fact, once in the Active
State, the baud rate may be changed to any value without consequence
to the MSE-1.

     In a multiple line configuration, if Single Unit Pushbutton is
set high, then the MSE-1's Pushbutton will control that one unit
only. If Single Unit Pushbutton is set low, then the Pushbutton will
control all MSE-1 units connected together.

3.5 User Account Database

     As factory set, the MSE-1 allows a maximum of 15 characters per
Login Name, and can hold up to 58 user accounts. If this is
satisfactory for the intended application, this section can be
skipped.

     The structure of the user account database can be customized to
alter the above configuration. This is controlled by the following
Parameters:

Login Name Length:
Location 10. The maximum number of characters permitted in a Login
Name. Hexadecimal value.

     Factory setting is 0F (15 decimal).

Password Offset:
Location 12. The number of bytes from the beginning of the account
where the user's Password is stored. Hexadecimal value. If Passwords
are not to be stored, this Location should be set to FF.

     Factory setting is 0F (15 decimal).

Telephone Number Offset:
Location 13. The number of bytes from the beginning of the account
where the user's Telephone Number is stored. Hexadecimal value. If
Telephone Numbers are not to be stored, this Location should be set
to FF.

     Factory setting is 11 (17 decimal).

Accesses Offset:
     Location 14. The number of bytes from the beginning of the
account where the user's cumulative number of Accesses is stored.
Hexadecimal value. If statistics are not to be stored, this Location
should be set to FF.

     Factory setting is 16 (22 decimal).

Failures Offset:
Location 15. The number of bytes from the beginning of the account
where the user's number of Failures since the last successful access
is stored. Hexadecimal value. If statistics are not to be stored,
this Location should be set to FF.

     Factory setting is 18 (24 decimal).

Next Account Offset:
Location 16. The number of bytes from the beginning of the account
where the next user's account begins. Hexadecimal value.

     Factory setting is 19 (25 decimal).

     The only field in the account database which is mandatory is the
Login Name. All other fields are optional, and may be removed if not
needed, to increase the number of accounts which can be stored. The
overall number of bytes available for the account database is 1460.
The number of bytes which each user account requires can be
determined as follows:


              Field             Length

          Login Name:          variable       (required)
          Password:               2           (optional)
          Telephone Number:       5           (optional)
          Statistics:             3           (optional)

     To customize the account database, determine how many characters
to allocate for the Login Name; and decide whether to include the
Password, Telephone Number, and Statistics fields. Divide 1460 by the
sum of the lengths of each field selected to ascertain the maximum
number of user accounts. For example: if either 4-character Login
Names are to be used with Passwords, or 6-character Login Names are
to be used without Passwords, and no other fields are to be included,
then each user account requires 6 bytes. 1460 divided by 6 yields 243
users.

     Set Login Name Length to the selected value. If Passwords are to
be included, set Password Offset to the same value; otherwise, set
Password Offset to FF. If Telephone Numbers are to be included, set
Telephone Number Offset to Login Name Length if Passwords are not
included, or to Login Name Length plus 2 if Passwords are included;
otherwise, set Telephone Number Offset to FF. If Statistics are
included, set Accesses Offset to Login Name Length + 2 (if Passwords
are included) + 5 (if Telephone Numbers are included); otherwise, set
Accesses Offset to FF. If statistics are to be included, set Failures
Offset to Accesses Offset + 2; otherwise, set Failures Offset to FF.
Set Next User Offset to the number of bytes per user account.

     Once these Locations have been changed, do not exit or use the
Account Menu option until formatting has been performed. Verify that
the above Locations are set properly before proceeding. Exit the
Parameters Option, and select Menu option 6 (Format). The following
message will appear:

               * to Wipe:

Type "*". The entire user account database will be formatted
according to the new account specifications. This DESTROYS all
current accounts, and takes several seconds to complete. When done,
the Menu will reappear. IMMEDIATELY select option 3 (Accounts) and
add the System Administrator's account. User accounts can be added as
required.

     The Format option can be used as a quick method to clear out all
accounts; just be certain to replace the Super account after
completion.
4. Hardware
This chapter discusses jumper options, hardware Menu access, and
system configuration.
4.1 Jumper Options
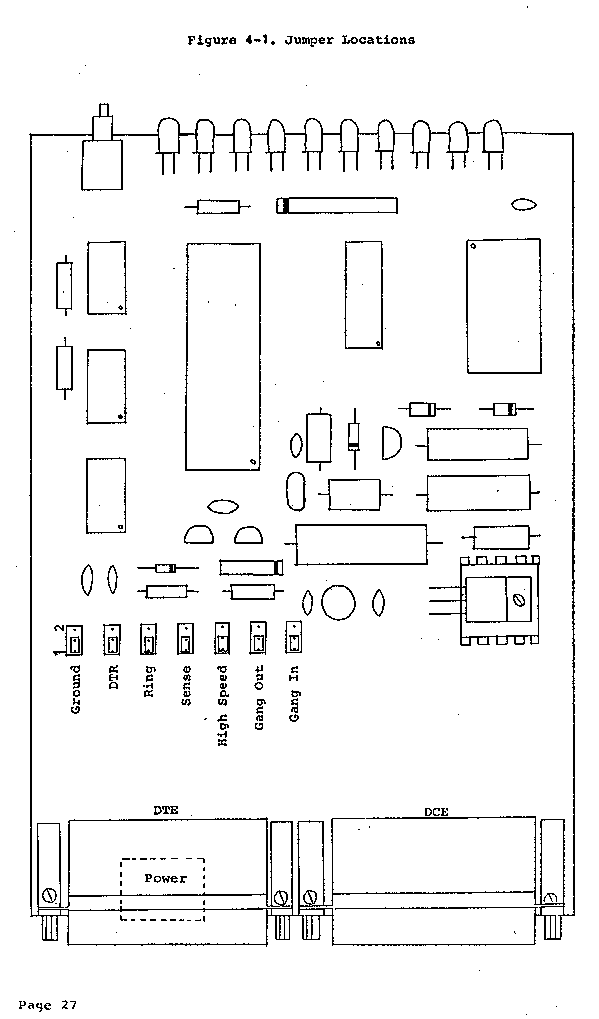
Seven jumper options are provided through the use of
two-position shorting clips. To gain access to these clips, unplug
the MSE-1 from its power source, gently lift the rear of the top
cover, and slide the cover to the rear. The jumpers are located on
the top of the circuit board, behind the DTE connector. Refer to fig.
4-1. Each of the jumpers consists of three pins, of which the center
may be shorted to either of the two outside pins. Position 1 denotes
the shorting clip to the rear of the unit (towards the RS-232
connectors); position 2 denotes the shorting clip to the front of the
unit (towards the indicator lamps). To change a setting, grasp the
shorting clip and pull up; position the clip over the opposite pair
of pins, and push down until the clip is firmly seated. Factory
settings for all jumpers are position 1.
Ground:
Position 1 connects case ground to signal ground (RS-232 pins 1 and
7). In all situations, the case and signal grounds between the DTE
and DCE RS-232 connectors are connected through in two pairs.
DTR:
Position 1 is used when the DTR lead on the DTE port is active. If
the DTE does not support the DTR signal, utilize position 2. In this
situation, Computer Pass Through operation cannot be performed (there
is no signal to indicate the end of the operation).
Ring:
Position 1 connects the Ring Indicator line (RS-232 pin 22) through
from the DCE port to the DTE port. Position 2 places a fixed negative
voltage on the DTE Ring Indicator line, preventing the modem from
signalling the computer that incoming calls are arriving.
Sense:
Position 1 selects Carrier Detect (RS-232 pin 8) from the modem (DCE)
as the controlling element. This signal is used to inform the MSE-1
that an incoming call has been received, and that a transition to the
Access State is required. It is also used to determine, after
instructing the modem to dial the user back, when the user has
answered and provided carrier. During the Computer Pass Through and
Active States, this signal is placed on the Carrier Detect and DSR
(RS-232 pins 6 and 8) leads of the DTE port. Position 2 selects the
DSR lead from the modem as the controlling element.
High Speed:
Position 1 enables detection of the High Speed signal (RS-232 pin 12)
from the modem. If it is desired to Autobaud even if this line is
asserted, utilize position 2. This inhibits recognition of the High
Speed signal.
Gang Out:
Position 1 enables outputs from the MSE-1 unit to other MSE-1 units
connected together. Position 2 disables these outputs.
Gang In:
Position 1 enables reception of outputs from other MSE-1 units.
Position 2 disables recognition from these units.
4.2 Hardware Menu Access
Should the System Administrator's account inadvertently be
removed and the Menu exited, or both Computer Pass Through and
Answerback Only bits set, it will not be possible to access the Menu
in the usual fashion. In the event that this occurs, use the
following procedure to reach the Menu. In a multiple configuration,
if the problem is loss of the System Administrator's account, but at
least one unit is accessible, issue a Copy command (section 5.4) from
it. This will restore that account in all units.
Connect an ASCII terminal through a null modem cable directly to
the DCE connector. The terminal must assert the DTR lead (which will
appear on the DSR lead through the null modem cable). Set the Sense
jumper option to Position 2. Select any of the available baud rates.
Unplug the MSE-1 from its power source, and pause ten seconds.
Depressing the Pushbutton and holding it in, power up the MSE-1. All
indicator lamps will briefly illuminate, and the DCE Lock and DTE
Lock lamps will then extinguish. Release the Pushbutton. Type
<Return>. The MSE-1 will display the statistics, and provide the
System Administrator's Menu. When the session is complete, restore
the Sense jumper to its original position.
An alternative method using the modem and not requiring cable
changes is as follows. Configure the modem so that it ignores the
status of the incoming DTR lead (switch 1 down for the Hayes
Smartmodem). Dial into the modem, letting it answer and provide
carrier. Follow the preceding procedure.
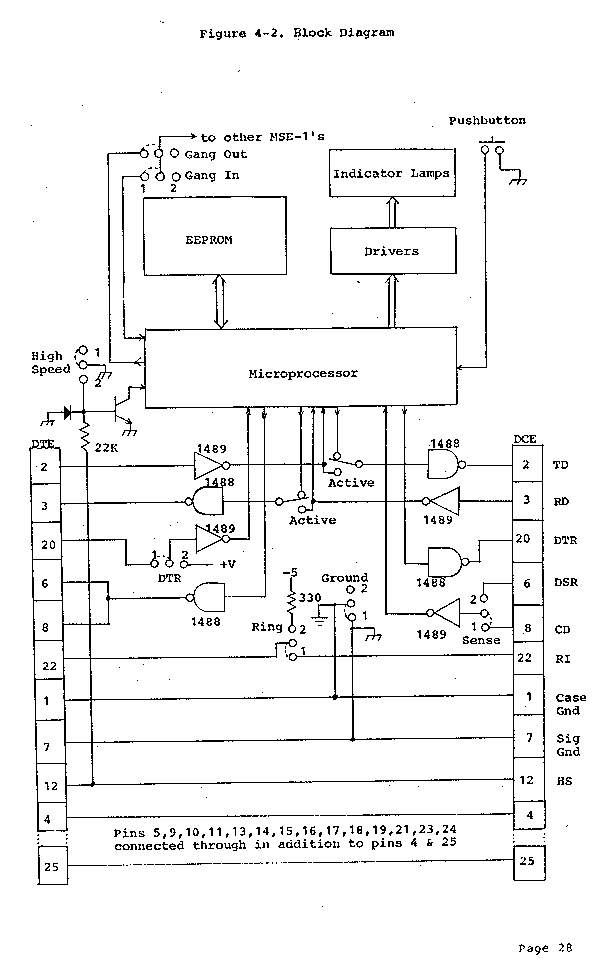
4.3 Block Diagram
Figure 4-2 shows a block diagram of the unit. All pins on the
RS-232 connectors are directly passed through with exception of the
following: 2, 3, 6, 8, 12, 20, and 22.
The switches shown in the RS-232 section are conceptual only,
and are implemented fully with solid state switches.
Figure 4-1. Jumper Locations
Board Photo
Figure 4-2. Block Diagram
5. The Multiple Configuration

     Multiple line configurations are best addressed by the rack
mount version of the MSE-1. In this arrangement, up to 16 MSE-1's are
housed in a single 5.25 inch high equipment cage suitable for
mounting in a standard 19 inch rack. Multiple cages can be
interconnected to effectively create a single large system.

5.1 Pushbutton Operation

     Assuming that the Gang In and Gang Out jumpers are in Position 1
(section 4.1), if the Single Unit Pushbutton bit is set low (section
3.4), then any Mode or Lock changes made via the MSE-1's Pushbutton
control all MSE-1 units in the system. Each time the Pushbutton is
released, Location 0E is copied from the affected unit to all other
units.

     If the Single Unit Pushbutton bit is set high, then use of a
unit's Pushbutton will affect only that unit; no broadcast is made to
other MSE-1's. Typically, one unit is selected to transmit Pushbutton
activity to the entire system, and all other units used for
individual Pushbutton activity. This permits rapid global Mode
changes to be performed, while retaining individual control.

5.2 Unit ID

     The unit identification provided (section 3.3) is primarily for
use in the multiple line configuration. It supplies a separate
identity for each unit, so that users calling a single access number
for an entire hunt group will have information as to what line is
accessed.

5.3 Automatic Updates

     The individual user statistics parameters (number of Accesses
and number of Failures) in addition to the global statistics
accumulators (number of Successes and number of Lockouts), when
changed, are immediately broadcast to all MSE-1's in the system.
Additionally, user Password changes automatically cause an update in
all units.

5.4 Copying

     Option 5 of the System Administrator's Menu provides the ability
to copy Parameters and the user account database from a single MSE-1
unit to all others. When this option is selected, Locations 10 and
above are broadcast. This does not alter the individual Unit ID's,
the Mode, or the Single Unit Pushbutton bit. After changing and
verifying Parameters and user accounts, this option should be
activated. It requires nominally two minutes for completion. DTE/DCE
communications of receiving units, in the Active State, are not
disturbed during the copy process.

     Neither Location 0E nor 0F are altered by a copy operation; it
is intended that the Pushbutton be used to modify the Mode. Location
0F contains the Single Unit Pushbutton bit, and is not transmitted to
prevent affecting that control. For initial system setup, any
communications parameter bits which are altered from the factory
settings in Location 0F should be handled individually, as well as
the Unit ID.

5.5 Connection of Individual MSE-1's

     To retrofit several individual MSE-1 units, not in a cage
configuration, into a multiple configuration, all that need be done
is to parallel pins 1 and 2 of the respective power connectors. Care
should be taken to ensure that the lines are not transposed.

     Alternatively, a cage housing may be purchased to convert the
units into the standard multiple configuration. To do so, remove the
four mounting screws on the rear of the individual housings, and
slide out the printed circuit cards. Insert the boards into the cage,
and attach the connectors.

5.6 Card Removal/Insertion

     This section describes how to access individual cards in the
rack mount configuration so that jumper settings may be altered or
new cards added for system expansion.

     To remove a card from the cage, first unplug both RS-232 cables
and the power cable from the desired card. Remove any rack mounting
bolts, and the two bolts from the right and left sides of the front
panel. Gently lift the front panel off of the LED's; slide the
desired card out of the cage.

     To insert a card into the cage, remove the front panel as
described above. Slide the card into the cage in the appropriate
guide slot. Do not attempt to replace the front panel by forcing all
card LED's through the panel simultaneously. Instead, place the front
panel a fraction of an inch in front of the cage assembly, and one by
one, slide each card forward so that the LED's fit into the panel.
This is done with a finger above and below the panel, in the front
access space of the cage. Do not force the card, and be careful not
to bend the LED's or pushbutton switch in the process. This is best
accomplished by pushing the LED's themselves rather than the card
edges. If misalignment occurs, the affected LED can be reached from
the top and bottom access space and realigned into the panel hole.
After all cards are slid forward into the panel, push the entire
front panel assembly with the cards toward the back of the cage until
the panel is flush with the cage. Replace the two bolts mounting the
panel to the cage and connect the power plug and the RS-232 cables.
The card cage can be remounted into the rack.

5.7 Multiple Cages

     To connect two or more cages together so that a single database
can be used for all cages in the system, a connecting cable is
required. Remove AC power from all cages to be interconnected. Two
cages are handled as follows. Unplug the power cables at the card
cage nd, and connect the transformer side into the connecting cable;
plug the connecting cable into the cage connector. Repeat for the
other card cage with the opposite end of the connecting cable.

     If three or more cages are to be interconnected, repeat the
above process for each cage; daisy chain from one cage to the next.
In this case, two connecting cables will be inserted between the
transformer connector and the cage connector for all cages except the
first and the last, which retain only one interconnection cable
interposed.

     When multiple cages are interconnected, the AC should be applied
and removed simultaneously to all cages. Plug each cage's power cord
into a power strip with an on/off switch, and use that switch as the
master power control.
6. DTE Access

     To access the System Administrator's Menu from the DTE port,
connect an ASCII terminal to the DTE port. If the terminal does not
generate a DTR signal, place the DTR jumper in Position 2 (section
4.1). Set the terminal to the Default Baud Rate (section 3.2). Turn
the DTE Lock indicator lamp off (section 2.7). Type any character;
the MSE-1 will respond with the Login Prompt Message. Log in as the
System Administrator, and the Menu will be displayed. Loss of DTR
will immediately terminate the session.

     If the MSE-1 is connected to a computer system which provides a
terminal package, permitting direct access to the MSE-1's DTE port,
this method can be used to program the unit. Software resident on the
computer can be used to automatically read account information, by
emulating the steps necessary to List accounts.

     If the Computer Pass Through bit is set high (section 3.4), Menu
access from the DTE port is precluded.
7. Formal Operational Description

7.1 Idle State

Idle:
   Illuminate Idle indicator lamp
   Lower DSR and Carrier Detect to DTE
   Copy DTR from DTE to DCE
   Isolate communications between DTE and DCE
   Initialize baud rate to Default Baud Rate
   Idle Loop:
      If Carrier Detect
         Go to Access
      Else
         If DTR from DTE is high
            If receiving a character from DTE
               If Computer Pass Through is high
                  Pause one second
                  Go to Active
               Else
                  Go to Access
         If Pushbutton is depressed
            Modify Mode and Lock
         Go to Idle Loop

7.2 Access State

Access:
   Illuminate Access indicator lamp
   Initialize Minute Timer to Access Time
   If Access is from DCE port
      If Protect is low
         Go to Active
      Else
         Pause Carrier Detect Delay seconds
            If High Speed is high
               Set baud rate to High Speed Baud Rate
            Else
               If No Autobaud is low
                  Wait for <Return> and read baud rate
   Getting Account:
      Send Login Prompt Message
      If Access is from DCE port
         If Answerback Only is high
            Go to Active
   Read Login Name from user
      If not in user account database
         If made less than Error Maximum mistakes
            Go to Getting Account
         Else
            Go to Lock Out
      Else
         If Initial Password is high
            Getting Password:
               Send Password Prompt Message
               Read Password from user
               If incorrect
                  If made less than Error Maximum mistakes
                     Go to Getting Password
               Else
                  User Failure:
                     Increment user's Failures
                     Broadcast user's Failures
                     Go to Lock Out
      If access is from DCE
         If Callback is high
            If user has a Telephone Number
               Send Calling Back Message
               Send Hang Up Message
               If Telephone Number less than 7 digits
                  Send Extension Dialing Message
               Else
                  If Telephone Number is 7 digits
                     Send Local Dialing Message
                  Else
                     If Telephone Number is 8 digits
                        Send Same Area Code Toll Dialing Message
                     Else
                        Send Long Distance Dialing Message
               Waiting for Answer:
                  If Minute Timer expired
                     Go to Disconnect
                  Else
                     If Carrier Detect is low
                        Go to Waiting for Answer
               If Callback Password is high
                  Repeating Password:
                     Send Callback Password Prompt Message
                     Read Password from user
                        If incorrect
                           If Error Maximum mistakes made
                              Go to User Failure
                           Else
                              Go to Repeating Password
      Increment Successes
      Increment user's Accesses
      Zero user's Failures
      Broadcast Successes, Accesses, Failures
      If Password Change was requested
         Change Password:
         Ask for new Password
         Read Password from user
         If Not <Return>
            Ask to repeat new Password
            If different
               Go to Change Password
            Else
               Modify user's Password
               Broadcast user's Password
      If System Administrator Account
         If no error made in Login Name
            If access from DCE
               If DCE Lock
                  Go to Idle
               Else
                  Go to Program
            Else
               If DTE Lock
                  Go to Idle
               Else
                  Go to Program
      Send Active Message
      Go to Active
Lock Out:
   Increment Lock Outs
   Broadcast Lock Outs
   Locking Out:
      Flash Idle indicator lamp
      If Pushbutton is depressed
         Go to Idle
      Else
         If Lockout Time reached
            Go to Disconnect
         Else
            Go to Locking Out

Disconnect:
   Send Hang Up Message to DCE
   Send Logoff Message to DTE
   Go to Idle


7.3 Active State

Active:
   Illuminate Active indicator lamp
   Initialize Hour Timer to Maximum Time
   Initialize Minute Timer to No Activity Time
   Activate communications between DTE and DCE
   Communicating:
      If data being transferred
         Initialize Minute Timer to No Activity Time
      If Pushbutton is depressed
         Modify Mode and Lock
      Copy DCE's Carrier Detect to DTE's DSR and Carrier Detect
      If DTE's DTR lead is low
         Go to Disconnect
      Else
         If Not in Computer Pass Through State
            If Carrier Detect is low
               Go to Disconnect
            Else
               If Protect is high
                  Check Minute and Hour Timers
                     If either expired
                        Go to Disconnect
      Go to Communicating


7.4 Program State

Program:
   Illuminate Program indicator lamp
   Menu:
      Display System Administrator's Menu
      Read option
      If option 0
         Go to Idle
      Else
         Perform requested function
         Go to Menu
8. In Case of Difficulty

     Should a problem be encountered in interfacing the MSE-1 in a
specific environment, and difficulty persists after consulting this
chapter, it is recommended that this manual be read in its entirety.

8.1 Hardware Problems

     Reconnect the DTE and modem, bypassing the MSE-1, and verify
that the modem auto answers incoming calls, and proper communication
is established through to the DTE. Verify that the modem's connector
is in the DCE configuration, and the protected equipment is in the
DTE configuration. If null modem cables are used in the original
setup, then the configurations presented to the MSE-1 might be
reversed. Be certain that there is a straight cable between the modem
and the DCE port; whatever cable works properly between the protected
equipment and the modem without the MSE-1 in the path should be
connected to the MSE-1's DTE port.

     Check that the DTE device generates a DTR signal, and that it is
active (high). If it is low, or not present, the DTR jumper must be
set to position 2 (section 4.1). The modem should be configured to
accept a DTR signal (even if the DTE device does not generate it; the
MSE-1 does). This is not essential, but simplifies the Hang Up
Message. Verify that the modem generates a Carrier Detect signal on
RS-232 pin 8; in some modems, a command must be issued to activate
the lead. If this signal is not available, try the DSR signal on
RS-232 pin 6; set the Sense jumper to position 2 (section 4.1).

8.2 Command Problems

     Be certain that the Carrier Detect Delay is set long enough to
ensure that any response sent by the modem is bypassed. Test the Hang
Up Message by accessing the unit and letting it time out while in the
Access State. The modem should hang up the call in two minutes
(factory setting). The factory setting for the Hang Up Message lowers
the DTR lead and pauses. The pause time may need to be increased. If
the DTR lead cannot be used to disconnect a call, the Hang Up Message
can be set to achieve command state and hang up the call. This can
often be done by pausing two seconds, sending "+++", and pausing two
seconds. Follow this with the modem's hang up command.

     If the system operates properly exclusive of the Callback Mode,
verify that the Dialing Messages are matched to the modem. Longer
pauses may need to be used prior to issuing the dial command. If the
modem is sluggish in lowering its Carrier Detect output upon loss of
carrier, pauses may need to be placed after the dialing sequence,
particularly if it is necessary to utilize the DSR signal instead of
the Carrier Detect signal.

8.3 Test Arrangements

     If problems persist between the modem and the MSE-1, connect an
ASCII terminal through a null modem cable to the DCE port. Place the
Sense jumper in position 2 (section 4.1). Simulate an incoming call
by raising the terminal's DTR lead (usually automatic), and check to
see that the Access indicator lamp illuminates. Proceed and observe
the commands sent by the MSE-1 to the terminal. If all operates
properly in this test configuration, but not with the modem, it may
be necessary to monitor the communications between the MSE-1 and the
modem.

     A monitor cable can be assembled as shown in fig. 8-1. Connect
the modem, MSE-1, and monitor terminal as indicated. Dial into the
modem with another terminal, and observe the command transactions.
Characters transmitted by both the modem and the MSE-1 will be
observed on the monitor terminal. Double character displays are a
result of DCE Echo being set; this is normal. Monitoring the data
transmissions and the DTR, Carrier Detect, and DSR leads should serve
to point out any areas of difficulty.


Figure 8-1.  Monitor Cable Connection
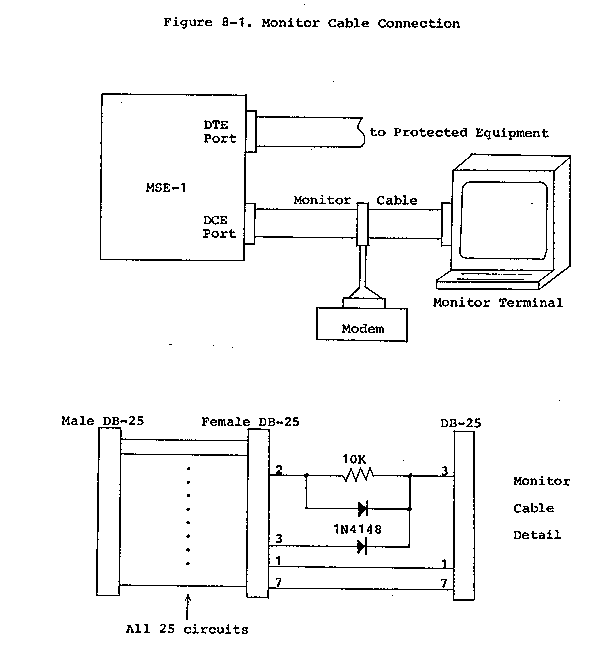
Appendix A. Hexadecimal Bit Map

     A byte consists of two hexadecimal nibbles. The upper four bits
are represented by the first nibble, and the lower four bits by the
second nibble.

Bit-7   Bit-6   Bit-5   Bit-4   Bit-3   Bit-2   Bit-1   Bit-0
              |                               |
        First Nibble                    Second Nibble

Each nibble consists of one of the following:

Hexadecimal Nibble Character       Bits
             0                    0 0 0 0
             1                    0 0 0 1
             2                    0 0 1 0
             3                    0 0 1 1
             4                    0 1 0 0
             5                    0 1 0 1
             6                    0 1 1 0
             7                    0 1 1 1
             8                    1 0 0 0
             9                    1 0 0 1
             A                    1 0 1 0
             B                    1 0 1 1
             C                    1 1 0 0
             D                    1 1 0 1
             E                    1 1 1 0
             F                    1 1 1 1
Appendix B. Hexadecimal/ASCII Table

Hex Code  ASCII Character         Hex Code  ASCII Character

   20         <Space>                50            P
   21            !                   51            Q
   22            "                   52            R
   23            #                   53            S
   24            $                   54            T
   25            %                   55            U
   26            &                   56            V
   27                                57            W
   28            (                   58            X
   29            )                   59            Y
   2A            *                   5A            Z
   2B            +                   5B            [
   2C            ,                   5C            \
   2D            -                   5D            ]
   2E            .                   5E            ^
   2F            /                   5F            _
   30            0                   60            `
   31            1                   61            a
   32            2                   62            b
   33            3                   63            c
   34            4                   64            d
   35            5                   65            e
   36            6                   66            f
   37            7                   67            g
   38            8                   68            h
   39            9                   69            i
   3A            :                   6A            j
   3B            ;                   6B            k
   3C            <                   6C            l
   3D            =                   6D            m
   3E            >                   6E            n
   3F            ?                   6F            o
   40            @                   70            p
   41            A                   71            q
   42            B                   72            r
   43            C                   73            s
   44            D                   74            t
   45            E                   75            u
   46            F                   76            v
   47            G                   77            w
   48            H                   78            x
   49            I                   79            y
   4A            J                   7A            z
   4B            K                   7B            {
   4C            L                   7C            |
   4D            M                   7D            }
   4E            N                   7E            ~
   4F            O

   0A          <LF>  (line feed)
   0D          <Return>
Appendix C.  Parameter Summary

Location       Parameter
  00-0D        Unit ID
  0E           Bit 0: Initial Password
               Bit 1: Callback
               Bit 2: Callback Password
               Bit 3: Protect
               Bit 4: Computer Pass Through
               Bit 5: Answerback Only
               Bit 6: DCE Lock
               Bit 7: DTE Lock
  0F           Bit 0: Transmit Odd Parity or Mark
               Bit 1: Single Unit Pushbutton
               Bit 2: No Parity
               Bit 3: No Autobaud
               Bit 6: DCE Echo
               Bit 7: DTE Echo
  10           Login Name Length
  12           Password Offset
  13           Telephone Number Offset
  14           Accesses Offset
  15           Failures Offset
  16           Next Account Offset
  17           Default Baud Rate
  18           High Speed Baud Rate
  19           Carrier Detect Delay (seconds)
  1A           No Activity Time (minutes)
  1B           Maximum Time (hours)
  1C           Error Maximum
  1D           Lockout Time (minutes)
  1E           Access Time (minutes)
  1F           Change Password Character
  20           Initialization Message Location
  21           Login Prompt Message Location
  22           Password Prompt Message Location
  23           Calling Back Message Location
  24           Active Message Location
  25           Callback Password Prompt Message Location
  26           Logoff Message Location
  27           Hang Up Message Location
  28           Extension Dialing Message Location
  29           Local Dialing Message Location
  2A           Same Area Code Toll Dialing Message Location
  2B           Long Distance Dialing Message Location
  2C           Upper half of Successes
  2D           Lower half of Successes
  2E           Upper half of Lockouts
  2F           Lower half of Lockouts
  30-FF        Message Area
Appendix D. Parameter Factory Settings

Location                Hexadecimal Contents                      ASCII

   00    4D 53 45 2D  31 20 55 6E  69 74 20 23  B1 FF 09 C2  MSE-1 Unit #....
   10    0F 00 0F 11  16 18 19 15  15 03 30 05  07 10 02 2B  ..........0....+
   20    30 40 6C 82  A3 54 DA E3  E6 E6 E6 EE  00 00 00 00  0@l..T..........
   30    41 54 45 30  46 31 51 31  53 37 3D 32  35 35 0D FF  ATE0F1Q1S7=255..
   40    0D 0A 0A F5  0D 0A 53 65  63 75 72 69  74 79 20 49  ......Security I
   50    44 3A 20 FF  0D 0A F5 20  52 65 74 75  72 6E 69 6E  D: .... Returnin
   60    67 20 59 6F  75 72 20 43  61 6C 6C 2E  0D 0A 53 65  g Your Call...Se
   70    63 75 72 69  74 79 20 50  61 73 73 77  6F 72 64 3A  curity Password:
   80    20 FF 0D 0A  43 61 6C 6C  69 6E 67 20  42 61 63 6B   ...Calling Back
   90    2E 20 48 61  6E 67 20 55  70 20 2E 20  2E 20 2E 0D  . Hang Up . . ..
   A0    0A 0A FF 0D  0A F6 2C 20  FA 20 42 61  75 64 0D 0A  ......, . Baud..
   B0    F9 20 50 72  65 76 69 6F  75 73 20 46  61 69 6C 65  . Previous Faile
   C0    64 20 41 74  74 65 6D 70  74 73 0D 0A  F8 20 41 63  d Attempts... Ac
   D0    63 65 73 73  65 73 0D 0A  0A FF 03 4C  6F 67 6F 66  cesses.....Logof
   E0    66 0D FF FC  85 FF FB 82  41 54 44 F7  0D FF FB 82  f.......ATD.....
   F0    41 54 44 31  F7 0D FF FF  FF FF FF FF  FF FF FF FF  ATD1............
          0  1  2  3   4  5  6  7   8  9  A  B   C  D  E  F
Warranty and Limitation of Liability

     IC Engineering, Inc. warrants to the original purchaser that
this product will materially perform in general accordance with the
specifications contained herein, and that all components contained in
this product will be free from defects in materials and/or
workmanship for 90 days from the date of purchase. During this
warranty period IC Engineering, Inc. will at no cost, promptly repair
or replace, at its option, defective equipment returned,
transportation charges prepaid by Buyer. This warranty shall not
apply to damage resulting from abuse, negligence, accident or loss or
damage in transit.

     IC Engineering, Inc. is in no way responsible for the security
of any computer, communications, data processing, or any other type
of system, makes no other warranty, expressed or implied, and
disclaims any implied warranty of merchantability or fitness for a
particular purpose. The sole and exclusive remedies for breach of any
warranty shall be repair or replacement, or at IC Engineering, Inc.'s
option, refund of the purchase price. IC Engineering, Inc., shall not
be liable for incidental or consequential damages to persons or
property, and its sole liability is as above set forth.
